Your Warehouse is a Black Hole. Here's How to Stop Losing Your Stuff (and Your Mind).
I want to tell you about the worst day of my e-commerce career. It was December 2018, peak holiday season in my small California warehouse. We were drowning in orders for a popular tech gadget. A customer, let's call him Mark, emails us, furious. His tracking says 'Delivered', but he never got his $200 gadget. I check my inventory system. It says we have 15 units left. So, I do what any good seller would do: apologize profusely and ship him a replacement, on the house. Two weeks later, my warehouse manager is doing a final stock count for the year. He comes to me, looking pale. “Boss,” he says, “we don’t have 15 of those gadgets. We have... zero.” It turns out, my inventory system was lying to me. The 15 units it thought we had were phantoms, a ghost number created by a series of small receiving and picking errors over months. So, not only did I lose the original $200 unit, I lost the $200 replacement I sent, and I had to refund Mark because I couldn't fulfill his order. That one single inventory screw-up cost me over $400 and a customer for life. The root cause? A chaotic, disorganized warehouse with no proper labeling system.
Look, nobody gets into e-commerce because they dream of selling cool stuff, building a brand, and making money. But here's the direct truth I've learned over 5 years of running warehouses in both India and the US: your inventory is not your product. It's your money, sitting in physical form on a shelf. And if you don't know exactly where that money is at all times, you are not running a business; you are managing a slow-motion bank robbery where you are the primary victim. A 2025 report from the E-commerce Intelligence Centre found that inventory distortion (a combination of stockouts and overstock) costs e-commerce businesses an estimated $1.8 trillion globally each year. That's not a typo. Trillion. And it almost always starts with a breakdown in basic inventory management and labeling.
This isn't going to be a boring textbook guide. This is the real, raw, 'I-once-found-a-$5,000-box-of-product-I-thought-was-lost-behind-a-shelf' guide to creating and using inventory labels that will save your sanity. We’re going to cover why your current system (or lack thereof) is a disaster, the dead-simple, free way to fix it today, and the exact labels you need to turn your chaotic stockroom into a lean, mean, money-making machine.
The Two Silent Problems in Your Warehouse: Mis-Picks and Ghost Inventory
Before you can fix the problem, you need to understand the enemies. In any warehouse, big or small, there are two demons that will eat your profits alive.
- Mis-Picks: This is when your packer grabs the wrong item. They grab a blue t-shirt instead of a red one, or a size Large instead of a Medium. The customer gets the wrong product, you get a bad review, and you have to pay for return shipping and the shipping for the correct item. It's a financial and reputational disaster.
- Ghost Inventory: This is what happened to me. It's when your software (or spreadsheet) says you have inventory that isn't physically there. It leads to stockouts, overselling, and promising products to customers that you can't deliver.
A 2024 study by ShipMatrix found that the average e-commerce business has an inventory accuracy rate of only 85-90%. Think about that. That means for every 100 items you think you have, 10-15 are either not there or in the wrong place. That's not a small leak; that's a gaping hole in the side of your ship. And the root cause of both these problems is almost always a failure of a clear, consistent labeling system.
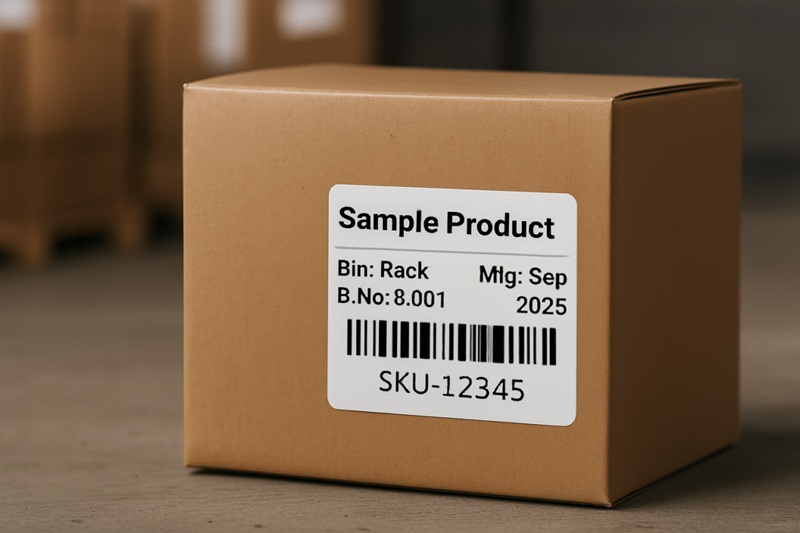
The Anatomy of a Perfect Inventory Label: Your Warehouse's GPS
So what does a good inventory label actually look like? It's not just a product name. It's a set of clear, scannable instructions for both humans and machines. It has to be instantly understandable to a new employee on their first day and perfectly readable by a dumb laser scanner.
Here’s what a world-class inventory label MUST contain:
- Product Name: Clear and human-readable. 'Men's Cotton T-Shirt - Blue, Large'.
- SKU Barcode: The single most important element. This is the machine-readable version of your product's unique identifier. Using a standard barcode label generator is perfect for this.
- Location Code (Bin Location): This is the game-changer. It's the physical address of that product in your warehouse. 'Aisle: A, Shelf: 03, Bin: B4'.
- Batch Number / Expiry Date (If applicable): For food, cosmetics, or anything with a shelf life, this is non-negotiable. It allows for a 'First-In, First-Out' (FIFO) picking strategy.
Personal Story #2: The FIFO Fiasco (India, 2021). I was working with a brand in India that sold organic snacks. They had a massive problem with expired inventory. Why? Because their packers would just grab whichever box was at the front of the shelf. They weren't rotating their stock. We implemented a simple label system with a big, bold 'MFG Date' and a location code. We then trained the team to always pick from the bin with the oldest manufacturing date. Their wastage from expired products dropped by over 90% in three months. It wasn’t a product problem; it was a process problem solved by a better label.
Building Your System from Scratch (The 100% Free Method)
Step 1: Create Your Warehouse Map
Before you can label anything, you need a map. Get a piece of paper and draw your storage area. Give every aisle a letter (A, B, C...). Give every shelving unit a number (01, 02, 03...). Give every shelf on that unit a number (1, 2, 3 from the bottom up). And give every spot or bin on that shelf a letter or number (A, B, C...). Congratulations. A spot in your warehouse now has a unique address, just like a house on a street. Aisle A, Unit 03, Shelf 2, Bin C can be written as A03-2C. This is your Location Code.
Step 2: The Master Inventory Spreadsheet (Your Single Source of Truth)
This is the brain of your entire operation. Open up Google Sheets or Excel. Create a master sheet with these essential columns:
| Column Header | Example | What it is |
|---|---|---|
| ProductName | Men's Cotton T-Shirt, Blue, L | The full, human-readable name. |
| SKU | TS001-L-BLU | Your unique alphanumeric code for that specific variant. |
| LocationCode | A03-2C | The physical 'address' from your map. |
| StockQuantity | 150 | The number of units you physically have. |
| ReorderPoint | 25 | When stock hits this level, you order more. |
Every single item in your warehouse gets a row. This spreadsheet is now your Bible. Every time you receive new stock, you update the quantity here. Every time you do a stock count, you verify it against this sheet.
Step 3: Generating and Applying the Labels
Now you use your master spreadsheet to generate your labels. You have two main types of inventory labels to create:
- The Product Label: This goes on the individual product itself (or its polybag). It should have the Product Name and the SKU Barcode. This is crucial for identifying the item during picking. I've covered this in-depth in my guide to product labels.
- The Bin Label: This goes on the shelf itself, right in front of where the product is stored. This label is the 'signpost'. It should have the Location Code large and clear, and also the SKU and Product Name so you can see at a glance what should be in that bin.
The Free Bulk Generation Workflow:
- Save your Master Inventory Spreadsheet as a CSV file.
- Go to a free online bulk label tool. The inventory label generator I built on this site is designed for this exact workflow.
- Download the tool's 'Sample CSV'. This is your cheat sheet. It will have the exact column headers the tool needs.
- Copy the data from your master sheet (SKU, ProductName, LocationCode, etc.) into the corresponding columns of the sample template.
- Upload the new CSV to the tool. It will instantly generate a print-ready PDF of all your bin labels and/or product labels.
The Pro Move: Switching to a Barcode Scanner and Thermal Printer
A spreadsheet and a laser printer will get you surprisingly far. It will take you from chaos to order. But to get from order to true efficiency, you need two pieces of hardware. This is the setup that every single professional logistics operation, from Amazon FBA to your local DHL hub, uses.
1. A USB Barcode Scanner (~$20 / ₹1,500)
This cheap little device is a game-changer. It acts just like a keyboard. You plug it into your computer's USB port, open a spreadsheet, and when you scan a barcode, it 'types' the SKU into the selected cell and hits 'Enter'. It’s that simple. But the implications are huge. Instead of manually typing a SKU during a stock count (and risking typos), you just beep it. Accuracy goes to 100%. Speed increases tenfold. A study by the GS1 US standards organization found that manual data entry has an error rate of about 1 per 300 characters, while barcode scanning's error rate is about 1 in 36 trillion. It’s not even a fair fight.
2. A Direct Thermal Printer (~$150 / ₹12,000)
I've screamed about this in my printer comparison guide, but it's even more true for inventory labels. You need to print one-off labels all the time—for new products, for new bin locations, etc. Wasting a full A4 sheet for one tiny label is insanity. A thermal printer spits out a single, durable, peel-and-stick label in a second. No ink, no toner, no waste. For inventory management, it's a non-negotiable tool for any serious seller. Check out my guide to the best budget thermal printers to see which models give you the most bang for your buck.
The 'Do It Right the First Time' Cable Labeling Checklist
Ready to finally conquer your cable chaos? Follow this simple checklist.
- Plan Ahead: Before you plug in a single cable, make a plan. Use a spreadsheet. It will save you from yourself.
- Standardize Your Naming: Create a simple, logical naming convention for your devices and ports. Stick to it religiously.
- Label Both Ends: A label on only one end of a cable is only half as useful. Both ends must have the same 'From/To' information.
- Use a Durable Label: Paper and a Sharpie won't cut it. Use a thermal printer for maximum durability, or at least cover your paper labels with clear tape.
- Color Code for a Quick Visual: Use different colored cables or small colored zip ties for different functions (e.g., red for power, blue for network, yellow for audio/video). This, combined with labels, makes identification instant. This approach is recommended by data center design standards like those from BICSI.
- Don't Be Lazy: Yes, it takes an extra 30 seconds to create and apply a label to that one 'temporary' cable you're plugging in. Do it. There is no such thing as a 'temporary' cable. That cable will be there five years from now, and you'll have no idea what it does.
Look, dude, I get it. This is the boring stuff. It’s the behind-the-scenes grunt work that no one sees. But your ability to master this boring stuff is what will allow you to scale. It’s the invisible engine that drives a profitable e-commerce machine. My $400 mistake with Mark’s order wasn't a shipping problem; it was an inventory problem. The chaos in your warehouse isn't just messy; it's a gaping hole in your bank account. Plug the hole. Label your stuff. It's the most profitable 'boring' task you'll ever do.